![]()
Colorsound Overdriver :
1974 reissue : 2014, this particular model of the Colorsound Overdriver effects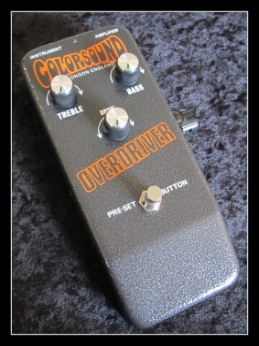 pedal was designed by Jake Rothwell in collaboration with Macari’s Musical Instruments, and features an alternative 9v. AC power jack, LED indicator, and ‘master volume’ control—which is a practical means of controlling overall volume level from becoming too loud, whilst preserving your desired TONE.
Generalized history : ‘Overdriver’ was previously marketed as ‘Power Boost’ during the late-60s. The Power Boost model was ultimately, designed to increase (boost) the volume level of a guitar amplifier’s input stage; thus, relatively increasing the gain (distortion) level. By the early-70s, the unit was marketed as ‘Overdriver’, and it’s circuit was basically unchanged. One notable artist whom employed the Overdriver, was Jeff Beck for his Blow by Blow album. Otherwise, one notable artist whom employed the Power Boost was that of David Gilmour (i.e., for his Dark Side of the Moon album).
Market value : Incidentally, I purchased two reissue Overdriver units (including the unit mentioned, herein) from the Macari’s website in 2014. Moreover, the purchase price of each was over $300 USD (£299 British pounds). A year later, I sold one of the units on eBay for $500. My sales listing was based on two factors : 1.) product recognition (celebrity-based history), and 2.) rarity. Ultimately, I set a trending price @ the time for this particular model. That said . . as of 2020, I noticed two original/ vintage Overdriver units were selling on eBay for up to $2,000.
Audio engineering techniques employed for the following video :
1.) All musical instruments were sound-recorded independently in stereo : drum loop, guitar, bass, keyboard. The portable recording unit employed, was the vintage D888 (Digital Recording Studio), by Korg. Audio resolution : 16-bit, 44.1 kHz (CD-quality). Note : the drum track was recorded, first.
2.) “Punch” recording technique :
“Punch” recording is a means to re-start recording @ the point, just prior to having made a mistake. In other words, I simply played my guitar to the drum track, and then stepped on a standard latching pedal connected to the Korg D888 “Punch” input feature; “seamlessly” having created a punch-in point, wherever I needed to begin a new recorded take/ performance—thus, creating the illusion of never having made a mistake. Ultimately . . such had turned out as a success, even though the entire laborious effort involved much patience. Nonetheless, each time I now listen to this particular sound recording, I am beside-myself of having created such an illusion !
3.) Next in order of recorded instruments was the bass guitar track, which had been recorded into the Korg unit, directly (in other words, without employing a microphone—as I did likewise, regarding the aforementioned drum loop and guitar). Note : outlined below, is a full list of gear in relation to said bass, drums, and guitar.
4.) After having recorded all of the musical instruments (drum loop, guitar, and bass) to the Korg D888 multi-track unit, I then decided to bypass transferring the .wav audio files (instrument tracks) over to PC via the Korg’s USB connection; choosing to instead, mix the instrument’s dB (volume) levels, equalization, and pan (panorama) stereo adjustments directly from the Korg unit, itself. Ultimately, after having created a balanced mix—along with distinctive stereo imaging—I was then ready for the next step of the procedure . .
5.) Note : Employ a proper insert cable to make the following connection :
I decided to transfer the audio signal via the Korg unit’s stereo headphone output—thus, bypassing the unit’s noisy main 1/4″ stereo analog output—thru a stereo pair of vintage input channels of a Mackie 8 buss analog mixing console. Headphone output? Yes. This alternative method of employing a stereo headphone output as a main output, had proven itself successful to provide a cleaner audio signal. From this point onward, I had begun to mix-engineer in the analog domain . .
6.) To set-up the Mackie analog mixing console to receive stereo output via the Korg D888 headphone jack, I had initially set the Mackie’s pan controls to full-left and right, relative a pair of selected input channels. I then raised said input channel dB levels (via the console’s fader controls) to maximum, whilst having decreased their relative trim control adjustments to minimum. I also, raised the stereo master fader control @ the console to the unity gain level (U/ +0 dB). Ultimately, as the stereo audio signal was being played back from the Korg D888 headphone output (thru the Mackie console), I had then slowly raised said headphone volume control (starting @ minimum) to VISUALLY monitor it’s output dB level via the console’s audio meters; thus, watching to avoid a distorted signal from occurring.
7.) Note : Employ proper insert cables to make the following connection :
The Mackie 8 buss analog mixing console offers 1/4″ insert points to accommodate outboard processing. For example, I had thus employed analog processing via a vintage Rolls/ Bellari RP520 Tube Preamp, as well as a vintage Bellari RP583 Tube Compressor/ Limiter. The procedure is as follows :
To hear (monitor) the music mix via the Mackie console’s headphone jack (employing professional-grade headphones—i.e., Sony MDR-7506), I patched the Bellari RP520 Stereo Tube Preamp into 2x Mackie CHANNEL insert points. With the tube pre-amplifier’s GAIN levels left in the OFF position, I then gradually increased (starting @ minimum) the unit’s VOLUME levels to ultimately provide a full-bodied, clean/ linear audio signal.
Next, I patched the Bellari RP583 Tube Compressor/ Limiter into the console’s MAIN stereo insert point; thus, relatively strapping the compressed audio signal across the console’s main stereo output. Whilst listening to the sound played back from the Korg D888 unit—thru the tube preamp signal, and ultimately thru the Mackie console’s headphone output—I had then begun to adjust the compressor’s controls to achieve a natural, non-distorted illusion of dB (volume) increase, and to further avoid any “pumping” effects as well (“pumping” describes the result of unnatural sounding, unbalanced levels of processing brought about via compression, in which volume appears to “swell” in and out).
Lastly . . I slightly, readjusted the dB output level via the console’s stereo fader control. For example, @ this point you can thus listen for and set an overall balance of musical instruments within the stereo field, or perhaps to make a particular instrument stand-out amongst the others.
8.) As result of all the above, I achieved a sonic illusion which surpassed my expectations; even eliminating a need for any further sound processing—including that of the master engineering stage! That said, the mix of instruments sounds balanced, warm, dimensional, smooth, and powerful. For example, you can hear said differences when auditioning this production, against that of some others I’ve uploaded to this website—again, this particular example having been processed mostly within the analog domain : mixing console, tube preamp, and tube compressor/ limiter. Incidentally, monitoring (listening) from a high-quality source, will you begin to notice my intended results as you gradually (and safely) increase playback volume level to your personal preference.
9.) The audio mix was then transferred to PC via the main analog XLR stereo output of the Mackie mixing console, over to a pair of XLR input channels of a Tascam US-1641 audio interface; ultimately being recorded, employing a vintage software application : Vegas Video by Sonic Foundry. The analog audio signal was thus digitized as a 16-bit/ 44.1 kHz stereo .wav file, so as to subsequently achieve a superior-sounding compressed file—such as .mp3 or .wma7 (128 Kbps/ CD quality).
10.) After having created the final .wav file, I then converted such (“saved as”) into 2 compressed file formats : .mp3 + .wma7 (128 Kbps/ CD quality). That said, .mp3 is used for this website’s audio player section, and .wma7 (incidentally, my favorite sounding file type) is used for my video soundtracks. Both compression types provide a manageable file size for Internet purposes (i.e., converting 30 MB to 3 MB). The software application employed to create the compressed files was that of the aforementioned Vegas Video. The .wav file is saved for archival purposes.
In order of sequence/ guitar signal chain :
* Fender Stratocaster (’96 US Standard)
* Ernie Ball 2223 Super Slinky guitar strings (gauges : 009 – 042)
* Mogami Audio Cables
* H.A.Z Laboratories Mutron 3+ Auto Filter
* Colorsound Overdriver
* Rotosound RPU1/ The Pusher Compressor
* Mesa Engineering Boogie Five-Band Graphic (equalizer)
* TC Electronic Sentry Noise Gate
* FX Loop : Roland RE-20 Space Echo
* Line 6 POD HD Pro (v.1)
(personal program preset, based on a ’72 Marshall 50w Super Lead amplifier + ’64 Fender Deluxe Reverb speaker cabinet)
In order of sequence/ bass guitar signal chain :
* Rogue VB100 “Violin” bass
* Mogami Audio Cables
* Line 6 Bass POD (v.1)
(personal program preset, based on a ’73 Acoustic 360 amplifier)
In order of sequence/ “drums” signal chain :
* Line 6 JM4 Looper effects pedal (drum loop, only)
* Mogami Audio Cables
* Origin Effects Cali76 Limiting Amplifiers (2x orig. units/ stereo pair)
* BOSS GEB-7 Bass Equalizers (2x units/ stereo pair)
Keyboard :
A vintage (ca. 1997) sound module employed to produce the virtual Hammond B-3 organ, was that of the Alesis QSR (Quadra Synth Rack Module). As such, I had subtly placed this particular track within the mix; just enough, to fill-out the stereo-field. Incidentally . . I had recorded only a single chord, sustained throughout the entire duration of the song (a producer’s technique, not meant to draw attention unto itself).
Suggested audio playback : High quality professional headphones (i.e., Sony MDR-7506), and a high quality pro audio interface are preferred. This way, the listener will hear the intended results of my music production efforts, inherent within the provided video presented below.
NOTE : There may be a delay for the video to download from my YouTube channel. Please, wait !
Epilogue :
I hope that what I’ve provided as an essential overview of my personal recording techniques, has helped inspire you to craft your own unique sound mixes. To the average home studio enthusiast, what’s been mentioned herein, must seem rather involved. As you realize by reading this post, such is NOT merely twiddling knobs on effects pedals. Rather . . such is to show how effects pedals enhance music recordings, along with pro-audio gear.
This Website :
The intention of fuzz-effect-sounds-and-more.com is to provide a reference resource; virtually sharing my gear collection, so that readers are made greater-aware of particularly good-sounding (and, in some instances), potentially collectible effects pedals. Otherwise, to also help those whom might benefit from my recording/ engineering techniques. Ultimately, as I continue to build and design this site, I will gradually introduce additional collection-based content—such as blog posts, image galleries, audio, video, and official manufacturer web links for your convenience. The information provided herein, is based upon biased opinion. Please, do your own research.
Ebooks :
Later . . I will offer for sale Part 1 of a series of self-authored eBooks, in relation to fuzz effects pedals; subsequently, also offering additional volumes regarding other effects types—boost, overdrive, distortion, etc—all via my private, independent collection. Moreover, these tomes of tone will include audio examples, color images, (in most cases) close-up circuit views, and generalized spec. information. Otherwise, said eBooks regarding fuzz effects pedals will additionally incl. generalized historical information as well. For details, please read this site’s eBook advertisement page.
THANKS for your interest of fuzz-effect-sounds-and-more.com
– Michael.
![]()
Disclaimer of Copyright & Trademark :
Product names, trademarks, and artists’ names (incl. the names of builders and designers) referred to, and/ or depicted herein are the property of their respective owners, which are in NO way associated or affiliated with fuzz-effect-sounds-and-more.com. Said, names and trademarks are used solely to identify products whose sounds were studied during the audio production efforts for this reference resource. The use of said, names and trademarks does NOT imply any cooperation or endorsement. NO copyright, nor trademark infringement intended. Any errors, omissions or variations in the subject-matter details are unintentional.
Disclaimer of External Web Links :
EXTERNAL web links are provided as a convenience, and for informational purposes only; they do NOT constitute an endorsement or an approval by fuzz-effect-sounds-and-more.com of any of the products, services or opinions of the corporation or organization or individual. fuzz-effect-sounds-and-more.com bears NO responsibility for the accuracy, legality or content of the external site or for that of subsequent links. Contact the external site for answers to questions regarding its content.

This Website & Its Contents : Copyright © fuzz-effect-sounds-and-more.com